12/27/12

AMA Unclassified: Some Stuff I've Done at Work

 I haven't been able to blog that much lately about creative 3D stuff because since I started work at AMA, I have been working on 'sensitive but unclassified' material.  Essentially, it's stuff that if I told you what I did, I'd have to kill you... or at least hit you with a wiffle bat.

Anyway, since most of my time at work is taken up with 3D, I haven't done that much at home.  However, there are a few things that I've worked on either as personal learning projects or developing something that might come in handy in the future.  A lot of what I now do would fall under the category of 'generalist' in the 3D world's terms.  That means I do a lot of 3D modeling, texturing, rigging, lighting, animating, rendering, and compositing... which is the whole kit and kaboodle, basically!  (I even do the music and sound effects now...)

One of my learning projects, I actually did this afternoon in After Effects.  My coworker told me about a great tutorial site called Video Copilot, which sells some great plugins for After Effects, but also has plenty of free lessons on how to do certain things in the program.  One of their tutorials inspired me to try something out to get some more practice in After Effects.  I never used it much before, except to composite my 3D frames together.  Anyway, this is what I came up with:


Now, you're probably wondering why I am proud about creating the above footage.  Well, let me first off explain that nothing of what you see in the video was actually captured as video footage.  I started off with two still images:

The Ares rocket on the launch pad at Cape Canaveral

A NASA T-38 chase plane

Pretty odd, huh?  I watched a tutorial where the guys at Video Copilot took a still image of a volcano and turned it into something that looks like it was video footage shot from a helicopter.  Essentially, it involves taking the still image and slowly distorting it from start to finish in the following fashion:


This gives the illusion of parallax and tricks your brain into thinking that the image is actually moving.  There is a lot of cleanup work, however.  For example, because the towers look goofy in the above twisted image, I had to separate them from the background and then clean up the area behind them so that it looks like nothing is there.  (I actually learned a lot about the tools in AE from this little exercise.)

After that, I added the small chase plane with a particle emitter coming out the back to give the sense of exhaust coming out.  I also added subtle things that help you think that it is real like the shaky camera movement, film grain, the spotty lens artifact, lens flares, and even some subtle chromatic aberration.  All in all, I spent some good time making it look pretty, which I probably wouldn't really get to do in a real production.  Most of all, I've learned how easy it is to fake things in 2D rather than creating them totally in 3D.

Another project I like showing off is the Earth-Moon rig I created using Modo:

My desktop background at work

I found some very nice, detailed texture maps on the internet and used them to create a 1/10,000th scale model of the Earth (Modo wouldn't handle the real scale).  The whole purpose of the rig is to be able to quickly adjust the controls so that you can get realistic lighting conditions and scale for whatever Earth-Moon image you might want to create.

There are controls that let you switch out the cloud texture, change the backdrop, change the season, change the time of day (and the dark side of the Earth will automatically light up... pretty cool stuff, if you ask me).  You can even scale up the moon and the sun if you want to go for some artistic license.  It has been a little side project of mine, but it has actually come in handy when someone came in and asked for a to-scale image of the Earth, the Moon and Mars for a presentation.  I just had to whip out that file and I was done within a half hour.

Bottom line: I'm really liking my work.

12/23/12

Letter to Santa - 2012

Dear Santa,

I'm sure, since you're the ultimate authority on naughty and niceness that your tech-elves have devised various data-mining algorithms to detect key phrases via the internet.  For example I'm sure that should I include the words coal, stocking, and reindeer manure in a blog page, I would automatically be put on the naughty watch list... well, hopefully that didn't put me on your watch list right now.  Anyway, since we're encouraged to be greenwashed environmentally conscious, like the previous years I decided just to post my Christmas letter to you this year on my blog in hopes that one of your vast cyber-elflings would stumble across it and pass the message along.

First things first, I have to tell you that when you stop by our chimney this year, you probably won't need to wear that fur coat of yours.  Honestly, it's going to be 80° outside this week, I think.  Maybe wear a breathable, yet modest, outfit and you'll be good.  You might want to bring a pancho, though, just in case we have rain on Christmas Eve.   The forecast doesn't seem to be calling for any, but I only trust it to within the next twelve hours.  Meteorology, in my eyes, falls in the same category as astrology and bone-reading.

Next I should point out that we actually do have a chimney this year.  For the past few years, every place I have lived has been sans-chimney, except for this year when we moved to a place that is hotter than the fires of hades during the summer.  I can't figure out what in the world someone would use a chimney for in Texas, except as maybe a launch tube for fireworks?  Anyway, when you come down our chimney, please try and shut the damper on your way in and out.  I've had enough standoffs with palmetto cockroaches in the past three months that I'd prefer not to invite any more of them in.

My little girl is looking forward to seeing what you bring her this year, although to be honest, I don't think she has a clue what is going on.  She seems to be confused that we're encouraging her to rip up paper only two days out of the year when the rest of the year she is forbidden from doing so.  Sorry that we didn't take her to see one of your helpers in the mall this year.  We really didn't want to pay $25 for a picture of her screaming.  If we wanted that, there are plenty of ways to achieve that within the comfort of our own home.

I don't know if you've got anything in your bag for me this year, but if you can manage a bit of employment stability this year, that would be great.  I was very fortunate to land a very fulfilling job at a NASA contractor doing what I love doing and receiving all the perks that make it worthwhile.  Honestly, I hope to be at it for a while, but with the looming fiscal cliff, I have a feeling of dread in my stomach.  (As a side note, for the longest time my attitude has been to let the government fail at all the problems that it has caused itself... but now that my paycheck in large is determined by the decisions of the federal government, I find myself whistling a different tune.  It's gut-wrenching at times.)  However, that's the only thing on my list, if you think you can make that happen.  After that, I'll worry about things myself.

In case you haven't heard, we have another little baby on the way in March, a boy.  If you have a little bit of R&R in your sack for the missus, I'm sure she'd love that.

I think you've spread out the Christmas gifts for us all year long this past year. It's been a relatively good year.  I got frustrated looking for jobs, but now that I'm settled in, I can't really complain.  The rent is paid, the car is running, and everyone is healthy.  For that, we are grateful.

Well, my daughter is whining downstairs, so I'd better go dig up some R&R from my own sack to give to my wife.  Have a merry Christmas, Santa, and don't use Apple Maps to get to our house.

-Brad Reynolds


10/30/12

Cucurbita Maxima 2012


This year I decided to do something a little closer to my personal interests and decided to carve a likeness of Neil Armstrong who passed away this year.  Admittedly, it's not my best carving to date, but to be honest, I had a rough day at work and just wanted to get it over with.


Armstrong is someone I personally admire for having the courage and curiosity to go farther away from home than most people will ever go in their lifetime.  Only a handful of men has ever walked on the moon and that is a pretty incredible accomplishment.  Having a job here at Johnson Space Center has really opened my eyes to how much is really discovered through space exploration.


Just to prove that I really did it.


Crickets... Crickets...

I promise I'm not dead.

I have sorely neglected this blog over the past few months, but for acceptable reasons:


  • I started a new job at Analytical Mechanics Associates
  • I moved myself and my family 2000 miles
  • I have been very busy at work
  • We just found out we're having a second baby in April
  • When you're wife is pregnant, you need to do more as a husband so she doesn't get worn out


I have things I have been working on and I have been enjoying my job.  I get to see plenty of cool stuff here in Texas at Johnson Space Center, and I hope to be involved here a great deal more.

Hopefully more creative things will pop up here soon...

8/3/12

Visualization

I've decided that I want to try and do some more product visualization renderings, so I have been redesigning a past product idea that I had while I was a student.  I needed a guitar as a prop for the demonstration images, so yesterday I took about ten hours in Maya and Cinema 4D to model and texture up a replica Stratocaster.


And yes, the knobs go to 11.

Demo Reel – July 2012... in HD!

I finally upgraded to an HD demo reel.  You'll have to go to Vimeo to watch it, but it should be better quality than what I had before:


7/13/12

Redneck Rabbit: A Cartoony Project

For a while I have been meaning to do this just as a quick, fun project.


I've still got some technical things to figure out on him, and I have a lot more props to create, but this is a start.  I did the base concept in ZBrush, then retopologized it in TopoGun.  I'm going to try and use Cinema 4D for this, just for fun.

7/6/12

Dungeon Displacement and Occlusion

Learning the ins and outs of displacement in Maya has been an interesting challenge.  I have continued to do the sculpting of the individual pieces in ZBrush and exported the maps out as 32-bit TIFF files.  I then convert those over to OpenEXR files just for the sake of memory reduction (truthfully, since I have Maya converting and caching the files as MAP files before rendering, that step probably doesn't matter).  The normal maps are the same method, except I convert those to PNG.


I also added an orange ambient light to the scene to try and mimic what was happening with Final Gather turned on.  There wasn't much that turning it on added to the scene except for render time.


I also had to make individual occlusion shaders for each of the pieces of geometry, but that was fairly easy to set up since all of the displacement shaders I created before for the gray models can just be connected right up.


I was struggling with render times, which I can probably blame the approximation editor for.  I decided to try out turning on the "View Dependent" setting for my renderings, which helped out tremendously. With that setting turned on, Mental Ray determines how much to tesselate your model based on your current view.  It is determined in pixel samples of the final image, rather than actual geometry length.


Occlusion helps define the scene a bit more, but I think something is going a bit crazy with some of the displacement shaders.  Maybe it's the way ZBrush exported them or the way that Maya is reading them back in.


 Either way, I'm set to finish this one up soon enough.  I just have the floor and the ceiling to complete the sculpting on.  Those will be the most memory intensive to work on, just because of their sheer size and how much detail needs to be in them.  In total, I think the floor will have nine displacement maps alone.  I learned recently that ZBrush is still a 32-bit program, which really surprises me.  ZBrush on my computer is pretty snappy at handling millions of polygons, but I am surprised that Pixologic hasn't written it in 64-bit yet.  I can easily max out the dedicated memory for the program, so let's hope I can finish this project up soon.


Barbarian Hair Redo

I took some time this morning to redo the Fibermesh hair of the barbarian.  For some reason in the textured renderings, they look incredibly dark.  Shaders and materials is where I start to get really disappointed with ZBrush.  However, now that I know how to export displacement maps and such to get what I want, I will most likely bring my creations in the future into Maya to render them.


To me this is one of those renderings that feels like the textures and lighting are fighting against the modeling.  The gray model feels much more defined.


I most likely won't revisit this one because I have a lot more on my plate to work on, but this is a decent anatomy exercise.

6/28/12

Dungeons and Darkness and 32-Bit Displacement! Oh, my!

This week was both a battle and a huge learning experience for me.  I was unsure as to how I was going to accomplish the high resolution details in this scene.  At first, I decided to go with Mudbox for the high-resolution sculpting so I could do the color and bump maps at the same time.  However, I the performance of Mudbox on my system still leaves me wanting better results.  In addition, the camera controls in Mudbox are kind of screwy and I have had many times where I couldn't find my model to start sculpting.

So I hopped back into ZBrush to do the high resolution sculpting.  This was going to be an interesting challenge because I haven't had that much experience with getting things from ZBrush back to Maya.  Mainly it's been rendering from within ZBrush.  This also meant learning about 32-bit displacement maps and how to set them up properly within a scene.


There were lots of iron fixtures and pieces that I put in the chamber and I didn't really feel like I needed to put fine painted detail on them since they weren't going to be the central piece of the scene.  I decided instead to use a set of 3D procedural textures to get the look I was going for.  In this dark scene, I think it will work just fine.


To get the super fine details within the rock and bricks, I had to use a combination of normal maps and displacement maps.  A normal map is typically used for the bump map details on your model, basically as a way to fake tiny details jutting out from your surface.  A displacement map actually pushes or pulls your geometry in or out accordingly, depending on what data is in the image file.  I had a hard time figuring out how to render out 32-bit displacement maps from ZBrush, mainly because of the confusing way in which I was using the Multi-Map Exporter plug-in.  At first my displacement maps were very subtle, then I realized that I was using the wrong subdivision level in ZBrush to calculate the displacement map from. Once I got that straightened out, the rest was a piece of cake.


Mental Ray does render-time subdivision and displacement through a little feature called the approximation editor.  Essentially, when the computer goes to render, it analyzes the displacement map to find where the most "movement" will occur within the model.  It then takes the low-resolution geometry and subdivides it only where it really needs it.


Overall, I am pleased with the way this is turning out.  With just the lighting, normal maps, and displacement maps, things are really starting to stand out.  It will be a bugger to render, and I hope that Maya can handle it all.  This will make a nice addition to my reel.


For kicks I rendered out an image with Final Gather turned on.  You can see how the lighting won't be so dark the added bounce diffuse lighting.  There will be some tricky hurdles ahead like adding light fog and some Maya fluids for the torch flames, but I hope I can get it all worked out.  So far, the learning experience has been very valuable.

6/19/12

You know what goes great with barbarians?

DUNGEONS!

I'm taking a break from sculpting on the barbarian to work on another project for my demo reel.  One of my own personal critiques is that I don't have a very organic environment in my reel at all.  I want to be able to do hard surface and environment stuff more than I would like to do characters, so I want to beef up my reel with more of those.

As I was working on the barbarian, I came up with the idea to do a creepy subterranean dungeon throne room.  This would allow me to have some architectural elements to the model as well as having some organic rock features.  Also, I could do some work with lighting and some fluid simulation in Maya when I get the chance.


I started working on this last week or so and have been trying to work smarter while I'm going along.  I have been doing something I don't normally do with this and that is doing UV mapping as I go along.  This is why you see my test checker texture on everything.  I wanted to see how these models will hold up with 4K textures.  I plan on hand texturing everything in Mudbox as well as doing render time subdivision and displacement.


I recently read an awesome tutorial on how to set up multi-UV tile textures and I am excited to try it out.  This will mean lots of trial and error, for sure, but it will also mean (hopefully) a better looking render in the end.  I struggled with trying to get multiple 4K texture maps in my thesis environment, so this should be an extra challenge.


The lighting in this is supposed to be gloomy, but this is essentially how things will be set up.  I have a lot more to add and I think I will be doing some fog around the pedestal area to enhance the dichotomy of the lighting.  It's actually going to be sculpted to look like a giant stalactite and there will be a really creepy looking throne sitting on top of it.  It's also going to have chains coming off the top like they are there to keep it from floating away.  Let's hope that it isn't too hard to work on.  I get bored with textures sometimes.

6/12/12

Barbarian Textured and Posed

I finally got around to doing a bit more with the barbarian sculpt in ZBrush.  The shaders that ZBrush has are very hard to work with and I don't like how it handles light.  They're fine for if you're just doing sculptural stuff, but when you get into trying to simulate subsurface scattering and hair, it loses some integrity.


I did have a chance to work with Fibermesh a bit more and I discovered that the best way to do long hair is to break up your source surface into different polygroups beforehand.  I'll have to try it again when I get a chance, but so far it turned out okay.  I can see some real limitations and I might try to get it into Maya eventually.  However, for now I am fine with this as it is.  Time to render it out and put it in my reel just to show I know organic modeling.

6/4/12

Human Anatomy: Barbarians are great!

I've had the chance to speak with a few individuals about my reel and portfolio and one of the consistent comments I have received is that my characters, while they may be detailed, don't really show that I know anatomy.  One of my first personal projects I decided to embark on was to do another barbarian, but this time in greater detail and fully textured.


I started off using the same human base mesh as before, but made sure it had UV coordinates before I tried anything.  I tried to loosely model the face after Dolph Lundgren.  He's got a pretty warrior-esque face, so I thought he'd do the trick.  The muscles feel nicely defined to me right now.  I'm still debating on whether to do this all in ZBrush or to take it into Maya.  For speed's sake, I might just stick with it in ZBrush so I can do all the hair portions with Fibermesh.

Bradley William Reynolds: Master of Fine Arts in Animation & Visual Effects

In case you are wondering, yes, I finally graduated with my MFA from the Academy of Art University:


Apparently I graduated Cum Laude... who knew?

The fancy leather case

Of course, they're waiting for final grades before they make any conclusions...

On Thursday, May 24th, 2012, we had our commencement ceremonies at the Cow Palace in Daly City.  I officially have my master's degree now, which seems a little strange.  When I finished my BFA, I swore I'd never go to school again.  I was an industrial designer and that's where I was going to say for all of my career... except for the little voice in the back of my head that told me I wanted to do animation/VFX stuff.  Every other industrial design job I looked at made me say to myself, "Yeah I could do that, but I'd probably get bored after a year."  That's when I had to do a lot of introspective thinking and figure out what it really was that I wanted to do.  Nine months later, I was back in school.

Three years later I finally finished.  I've had the question asked of me by others and by myself, "Now what?"  The answer is that I don't really know for sure.  Just like many other industries, the VFX industry isn't flourishing like it once was fifteen years ago.  Things have shifted internationally as well where the quality of work coming from developing countries is getting a lot better.  If you look at the page above with the red circle on it, you'll notice that 75% of the names are Asian.  Like other industries that are really service-based, the U.S. usually loses out.  The biggest key for me will be getting into the right job just to have my foot in the door... but I just don't know which door that will be.

I am both anxious and excited to use my new skills.  I haven't had much positive response from companies that I have been inquiring at, but hopefully things will change.  We shall see where I wind up next.  I keep saying that I had my life planned up until the 25th of May.  After that, my schedule opened right up.

I have some projects on hand to keep myself busy in the mean time.  You'll be seeing some of the progress for some of those as I will keep updating this blog.  

5/21/12

Academy of Art University 2012 Spring Show


I was very excited and humbled to receive 1st place for 3D Modeling – Environments for my spaceship environment at the school's spring show.  I wasn't originally planning on submitting to that category, but one of the faculty strongly suggested that I do so.  Her suggestion paid off immensely.

I feel very honored to have this at the end of my career at school.  I worked hard and am grateful for the help of many faculty and students that I've had along the way.  I went to school with some immensely talented people.

5/9/12

Organic Modeling: Tallis Textured

The semester is just about over, so I am wrapping things up with my classes.  I had a fun time doing the polypainting for the Tallis model, although I still see room for improvement.


I used a fairly new feature called Lightcap in ZBrush to do the lighting this time around.  It essentially lets you light your model by placing virtual lights around a spherical environment.  It gives you much more control over the falloff, spread, and shadow of each light and gives much better results in my opinion.  You can even load and sample any image to create a lighting setup and background for your model.

5/1/12

Organic Modeling: Tallis Sculpt Progress


I spent time finishing up the little details of my model using both ZBrush and Maya to do some of the little props.  If I was making this for animation, I would go back and redo the topology of some of the parts because they are very high resolution for being so small.  However, I am pleased with how it is turning out.


I plan on doing a bit more work and then hopefully texturing it up.  It will make a nice addition to my demo reel then.

Approved!

I just wanted to post and say that on Monday, April 23rd, I successfully presented my thesis project and was approved for graduation.  The review committee consisted of four individuals from AAU: Chris Armstrong, Stewart Lew, Ease Owyeung, and Derek Flood.  I kept my presentation brief, didn't give much background, and mainly focused on showing them what it was that I learned throughout the whole process.

Their deliberations were brief and they had some very complementary things to say to me afterwards as well as some advice for improvement, which is always welcome.  My stuff isn't perfect.  They were also very adamant that I submit my stuff into the AAU Spring show this year and wanted me to be able to be at the reception where recruiters come in to look at prospective hires.  So now I am busy making up a poster to hang up on the walls at school so that everyone will see my project.

All in all, I wasn't really nervous to present my project.  I knew I had done what I had proposed to do at my midpoint and was really just anxious beforehand to get it over with.  It was a good experience and I had a flood of relief when I was finished.  Afterwards, I was pampered all week long by my loving wife with a trip to Cold Stone, an afternoon matinee to see The Hunger Games, and a half-hour chair massage.

Master's degree, consider yourself almost complete.

4/25/12

Organic Modeling: Tallis Posed & Detailed

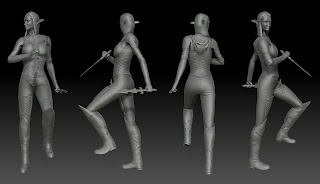
I have sort of previously neglected this project in order to focus on my thesis, but this week I wound up with some time to work on it.  It's getting closer to being done and I am happy with the results that I have been able to achieve.  Using the Transpose Master plugin for ZBrush I was able to take the model and pose it in something other than the neutral bind position.  I then set about to put in all sorts of folds in the clothing, trying to follow the shape of the body in doing so.  One thing that can ruing a model is doing clothing folds the wrong way.


I also created a hood using a sphere and Dynamesh.  The daggers and little diamond pieces were created in Maya, but that's just because I wanted to get some decent topology out of them.  I still have to work on the hair and I also need to create a base for her to be standing on.

This project and class has taught me a lot more about ZBrush and the many tools that are available in it.  It has made my workflow a lot easier.

4/20/12

Thesis Project: Diaspar – Final Rendered Footage

Well, the time has finally come.  I have gathered together all of my renderings, completed some post work on them, and finally had a chance to upload them.  I highly suggets viewing it on Vimeo so you can see it in HD.


4/17/12

Organic Modeling: Tallis Beginnings

I am having a bit of a slow start at this, but I still have plenty of time to work on it and perfect it as I go.  I started off doing my model of Felicia Day as Tallis from Dragon Age.  I started off doing a base mesh in ZSpheres, and did okay with that for a while, but eventually I was fighting the topology of the ZSpheres.  I took the rough base I had created in ZBrush and brought it into Topogun to redo the topology.

Once I got that finished and back into ZBrush, I spent some time doing anatomy.  However, I realized I was spending way too much time on areas that were going to be covered by clothing anyway.  That made things simpler and eventually I split pieces up, created new clothing using Topogun as a base start, and also made a few props using Maya.


It still has a way to go, but it is getting there.  I think it will be easier to do some of the detail work once she is posed.  In the end, she is supposed to resemble this:


Close, but no stogies yet!

4/16/12

Cinema 4D: MoGraph and Bullet Dynamics

This past week has been my spring break, which really hasn't meant much, except that I got to take one day off and play.  In the mean time, however, I also picked up a copy of Cinema 4D R13 Studio while I could get it at an academic discount.  I have always been a fan of Cinema 4D, even though it isn't used heavily within the United States for animation.

I had a previous version of C4D on my computer, but not with all the bells and whistles attached to it.  This new version adds a lot of features that bring it up to speed with a lot of other comparable 3D packages.  One of the coolest features that is is mainly used for is called MoGraph.  It allows for some pretty interesting motion graphics to be created just by using expressions and simulations.  For example,  the following video called "No Keyframes" was created using MoGraph without any keyframe animation, just scripts:


One of the powerful things about MoGraph is its ability to clone a single object multiple times in whatever shape you want.  I decided to give MoGraph and the dynamics engine a test last night just for fun.  I took a simple cube and cloned it using MoGraph to a 20 x 20 x 80 matrix of cubes.  All in all, that turned out to be 32,000 cubes!  It was more than my computer could display at once if I rotated the camera, so I had to be careful on how I did things.  I ran the dynamics simulation of a heavy metal ball hitting the tower of cubes to see what would happen, making sure to save the cache.  It took a good half hour per element to run the simulation, which isn't bad considering that you have to simulate the paths, rotation, and velocity of  32,002 individual objects.  The cache wound up increasing the file size to almost 3GB, which tells you how much data is involved with something like this.  I rendered it out and added motion blur and the depth of field in After Effects:


All in all, it turned out okay, especially for a test.  There are guys in the industry that do this all day long with fluids, smoke, and other things.  I can't wait to get into some other cool features of MoGraph and learn it.  Cinema 4D, although it isn't the main staple of the animation industry in the United States, still has some fun potential.  In closing, take a look at this little short called "Hooked", made completely in Cinema 4D:


4/3/12

Thesis Project: Presentation Still Renderings

The end approacheth...

After a marathon week of doing texturing and rendering non-stop, I finally finished (almost) all the still renderings for my written thesis presentation.  Here are some of the renderings from previous semesters:


In the rendered views of the exterior of the Kobol that I had before, the camera angle was above the midline of the ship, which was making it look small.  I got a suggestion from my instructor to keep the camera angle close to the ground and it would look closer to how someone would normally view it if they were standing next to it.


I added some glow and lens flares to the renderings to help them feel a bit more surreal.  I know that the spaceship design isn't contemporary, but it's what I've been going with.


I spent most of my time this past week doing the final texturing of the interior of the Kobol.  One of the main changes to previous iterations is the addition of an architectural element above the angel statue in the main waiting area.  As I kept looking at, it just didn't look complete.  So I took a rendering and began to sketch over top of it and finally came to an iteration that I thought worked.


Each one of the final rendering frames for the interior took between one and a half to five hours to finish rendering.  With the amount of raytracing going on in the scene, it was no wonder.  I used mainly Mental Ray architectural materials for the shaders, which rely heavily on reflected light/color within your scene.  They do a really good job at creating metals and polished surfaces, which is what comprises most of the interior of the ship.


The plants were what was a main cause of grief in terms of rendering times and memory requirements.  I used a bunch of plants from the XFrog libraries, all of which are pretty high resolution.  In addition, the textures that the leaves have on them also use an alpha channel to get the transparency.  The way that Mental Ray handles raytracing through the alpha channels is apparently very time consuming.  Thus the hike in render time.


I also had to deal with some problems where some of the plants weren't rendering at all when I went to batch render.  I have been referencing the plants in so that I woudn't have to deal with the huge file size associated with just importing the files in.  In addition, I have been instancing some of the plants rather than just copying them.  That allows for a "copy" of the geometry to be made, but the data that created basically links back to the original geometry and just saves transformation, rotation, and scale data.  I did some investigation and discovered that the plants I had imported that were grouped weren't being recognized as true instances when render time came around, so I cringed and just duplicated the plants. My file size increased about 130MB, which is a lot for a 3D file, but it is still manageable by Maya.


I also spent some time working with the procedural texture generation program Genetica Studio.  It allows you to mix a bunch of procedural texture nodes to create a high-resolution, seamless texture.  I used it for most of the marble and stone textures as a base and then added some more photographic texture on top of the images I created.


I also created a depth pass for each of the scenes I rendered out.  This allows me to do a quick depth of field blur to the scene anywhere I want to rather than relying on Maya to generate one that I have no control over in post.


Overall, I am satisfied with the results.  It definitely adds a different flair to the model, but the marathon texturing session isn't one I ever want to repeat... like that ever happens in the industry!


Now that I have most of my stills done, I have been printing my final written thesis book.  It is taking a while, but it has allowed me to work on other items as I go along.  I still have some animated footage to work out, but for the most part, I think I am on my way to the end.