9/27/11

Thesis: Alex Displacement Maps & Retopologizing

This week I started to delve into some of the technical details of the model.  After getting the meshes back from ZBrush, I wound up extracting displacement maps for each of the articles of clothing.  A displacement map essentially tells the rendering engine at render time how much to pull or push a mesh a certain direction in space.  In addition, at render time, you can set your meshes to subdivide into a finer resolution, thus allowing you to capture minute details without using up lots of memory while animating your model.


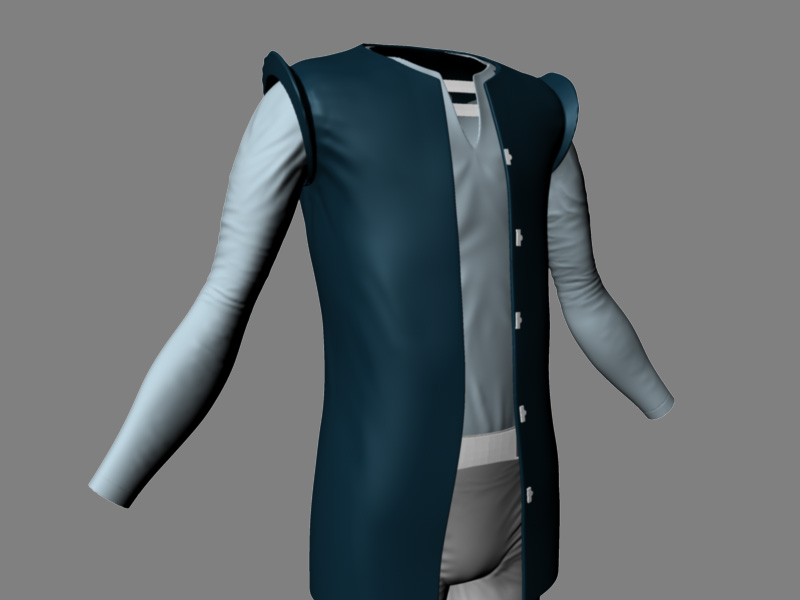
There are still some issues that I am discovering with the displacement maps that I'll have to fix.  For example, the shoulder hoop on the vest here has some strange artifacts going on with it where it should just be straight.


For the geometry of the head and hands, I wound up retopologizing them to get a better mesh out of them.  The mesh I started off with was a fine base mesh, but once I sculpted in the details, I found that some areas needed more detail for certain facial features.  For example, the forehead was far too sparse for any type of real emotion to be displayed if I wanted to create a blend shape for facial animation.  Topogun allows you to bring in a high-resolution model and essentially draw your new topology straight on the surface.  From there you can export displacement maps or output your new geometry for sculpting in ZBrush or Maya.  This is why I was excited for the new features of ZBrush as well as learning about Topogun.  They now allow for a 3D sketch to be converted into an animation friendly mesh with just a little bit of work:


9/25/11

A Sunday Afternoon Sculpt

Just playing around some more in ZBrush:


9/22/11

ZBrush 4 Release 2

As I mentioned in a previous post, ZBrush has just come out with a new release of their software which is a huge game changer for me.  The main thing that I love about it is the new Dynamesh feature.  In previous versions of ZBrush, you were pretty much stuck with your base mesh and if you stretched your geometry too far, then you would get some very bad results.  Dynamesh does something called "voxel sculpting," I believe.  Another program called 3D coat has a pretty good explanation on the principle.

This little iguanadon alien thing started out as a simple 3D sphere.  With a few pushes and pulls from dynamesh, I was able to eventually get the basic proportions that I wanted and then from there I did the normal ZBrush workflow of adding progressive details, even down to the fine details and textures.  I then used Polypainting to get a rough texture on it.  


All in all, the whole process from start to finish was about two hours.  I'm sure in the future I can get the time down, but this changes a lot of things for me.  For one, I'm not afraid of doing character meshes now that I can do this and then bring it back into Topogun to get it some animation-friendly topology.  Right now it's only a "sketch," but it still is a heck of a lot quicker than doing a character the old fashioned way.


Advanced Lighting & Texturing: Chimi Materials Update

These are just some minor updates to the color and bump maps, as well as the properties of the skin of the Chimi character. 


9/20/11

Thesis Project: Alex ZBrush Sculpts

This week I took my human character, Alex, into ZBrush to do the fine detail sculpting.  This is where a lot of the fun is in 3D modeling, because you get to push, pull, carve, pinch, and soften your mesh using a stylus and tablet.  It's much more intuitive and rewarding than working with floating polygons in space, and I imagine that most people could pick up on it quick enough.  Pixologic, the company that makes ZBrush, just announced some new voxel sculpting tools that makes the conceptual process of 3D modeling a lot more streamlined and artist-friendly.


For the most part, Roger wanted me to not worry about the technical details of the model as I went into ZBrush and just to have fun.  He introduced me to a retopologizing program called TopoGun, which I can see as being an indispensable part of any 3D artist's toolset.


Changing around materials is one way to see how different areas are looking in your model.  I switch between materials many times during a sculpt and it helps me to see different areas better.  Some materials are better for small details while some are better at showing where the cavities on your model are.  And there are some that are just goofy...


The goal with this sculpture is to get it looking as close to Mr. Freddie Boath as possible.  Unfortunately, I don't have many high resolution reference photos of the young British actor, so I'll have to get it close enough.


I could take it all the way up in sculpting even to the small textures, but that is for the future.  Plus, I will probably do that in Mudbox, considering that there are a few textures that have geometric patterns on them.  Now that I've done this, though, I want to try out some of ZBrush's new tools.  Alas, if I only had the extra time.

9/15/11

Advanced Lighting & Texturing: Chimi Texture Maps

After gathering a bunch of photos of clothing and textures, I got to work this week texturing Chimi.  The surfaces were all NURBS, which are a pain to texture as they are without doing some very difficult texture work.  So I spent about a day getting the surfaces into polygons and getting the UV maps on them.  I was a bit rough at UV mapping, so you'll have to forgive the roughness, although the textures seem to hide most of it.

I mainly used photographic textures for the clothes, taken from Sarah's wardrobe.  I then took the hair and arms into Mudbox to essentially paint in the details by hand.  I wound up sculpting the hair and exporting it as a normal map as the bump.  The skin required painting the colors, then creating separately saturated and desaturated color maps for the epidermal, subdermal, and back scatter layers of the skin shader.


All in all, it was a good exercise, but it took way too long.  I'm sure we'll have more work to do on this or other models, so I can't dilly dally on just one for too long.

Plus, I've got a thesis project to work on.

9/11/11

Alex Modeling Progress

I'm very happy to have Roger Ridley as my one-on-one advisor for my directed study.  Roger went through AAU before in the same program as me and has since worked as a modeler on such movies as A Christmas Carol and Mars Needs Moms.  Currently he does programming at Lucasfilm and shows a real passion for what he does.  He will be a great asset to draw on while I'm in school.

The model I am having him work with me on is the Alex model.  He found some problems with the model (problems being some topology issues that are a real "no-no" in the industry) which were easy enough to fix.  My hope for this week is to fix a few more small topology items, then get to work on UV mapping Alex.  This Wednesday will be the first time I'll have to bring him into ZBrush and try out some detailed sculpting.


However, I must admit that seeing how Roger does some of his work is a lot more intuitive than my current approach.  We'll chalk this model up to a learning experience.

Professional Practices: Artist's Statement

Another class I am taking this semester is a professional practices class.  This is very similar to classes I have taken in the past where you prepare yourself for the real where where they expect results.  One of the first assignments was to write an "Artist's Statement," which basically amounts to telling people why you do what you do as an artist.  Here's what I came up with:


Ayn Rand once stated, “To achieve, you need thought.  You have to know what you are doing, and that’s real power.”  The gift of man’s intellect has given him the ability to collect, organize, interpret, and transform the materials of his world into something that previously only existed in the ethereal realm of the mind.  Man has the power to create.

Creation is the business I am employed in.  Although I run the gamut of tools to turn imagination into reality, the creative power of my mind is the driving force behind my work.  Whether it be my own ideas, creations inspired by others, designs of my peers, or a collaborative production, my love of the creative process is what fuels my passion for imaginative work.  As I began my career path, I tried to conceive my work through a three word mantra: Design, Energy, Motion.

Design: The structuring of elements into a cohesive design is a crucial part of our existence.  Design brings order from chaos, definition from ambiguity, peace from turmoil.

Energy: Every sensory experience that we are exposed to evokes an emotional impact within the beholder.  It is essential that the underlying elements be imbued with the correct proportions, materials, and hues, so that it successfully and responsibly fulfills its purpose.

Motion: Time is always in motion.  Solutions that are reached during the present will not always stand the test of time.  There is always a better way to accomplish something, even if the necessary means to do so are not yet within our reach.  Adaptation and a course of continuing education are essential for success in our rapidly advancing world.

I seek after the best possible iteration of an imaginative idea, whether from myself, my clients, or my peers.  By witnessing the best of both individual and collaborative creations, I am constantly inspired to continue to seek after that which is just beyond the horizon.

Advanced Texturing & Lighting: Chimi Base Materials

One of the classes I am taking this semester as directed study credit is an advanced lighting and texturing class.  I'm hoping to pick up a few techniques to help out in the texturing of my thesis project. This class will feature a lot of texturing work, but hopefully will teach me a few new things about lighting and rendering that I don't know about yet.  One thing about that area of the industry is that it is always changing.  Programmers are always looking at quicker ways to do rendering and advanced lighting techniques, so that's one thing to stay abreast of.

In this class I was given the model of a character, Chimi, and this week we were to create and assign all of the base shaders with no texture on them.  I mainly used a combination of different shaders from the simple Phong (the name of a particular type of shading algorithm), to anisotropic (which renders out very elongated highlights, like what you would see on brushed metal), and a subsurface scattering skin shader for the face.


I also made a quick 3-point lighting setup and did a turntable rendering to see how the light moved across the surface of each shader.


Unfortunately, most of Chimi is comprised of NURBS surfaces, which are a pain to texture.  So this week my task involves converting the surfaces into polygons and UV mapping them.  Typically, that is the job of a modeler, not a texture artist, but this class is unfortunately out of date.  Oh well, it's just more experience, right?

9/4/11

Thesis Project: Robot Modeling Progress Continued

I'm getting closer to getting this model completed.  Mainly I've been working on it until I could start getting consistent feedback at school.  Since classes just started, I might switch back to the Alex model for a while to finish that one up.

This week I divided out the torso and started work on the head and joints of the neck.  I changed the hands a bit because I didn't like how they looked in proportion to the rest of the body.  I might go back and redo both the hands and head because I'm not really pleased with the topology.  Too many artifacts are showing up in both previews and renders.

Either way, though, I'm a step closer.