4/25/12

Organic Modeling: Tallis Posed & Detailed

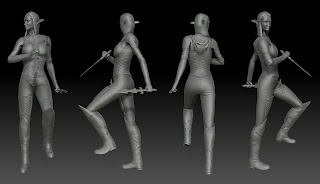
I have sort of previously neglected this project in order to focus on my thesis, but this week I wound up with some time to work on it.  It's getting closer to being done and I am happy with the results that I have been able to achieve.  Using the Transpose Master plugin for ZBrush I was able to take the model and pose it in something other than the neutral bind position.  I then set about to put in all sorts of folds in the clothing, trying to follow the shape of the body in doing so.  One thing that can ruing a model is doing clothing folds the wrong way.


I also created a hood using a sphere and Dynamesh.  The daggers and little diamond pieces were created in Maya, but that's just because I wanted to get some decent topology out of them.  I still have to work on the hair and I also need to create a base for her to be standing on.

This project and class has taught me a lot more about ZBrush and the many tools that are available in it.  It has made my workflow a lot easier.

4/20/12

Thesis Project: Diaspar – Final Rendered Footage

Well, the time has finally come.  I have gathered together all of my renderings, completed some post work on them, and finally had a chance to upload them.  I highly suggets viewing it on Vimeo so you can see it in HD.


4/17/12

Organic Modeling: Tallis Beginnings

I am having a bit of a slow start at this, but I still have plenty of time to work on it and perfect it as I go.  I started off doing my model of Felicia Day as Tallis from Dragon Age.  I started off doing a base mesh in ZSpheres, and did okay with that for a while, but eventually I was fighting the topology of the ZSpheres.  I took the rough base I had created in ZBrush and brought it into Topogun to redo the topology.

Once I got that finished and back into ZBrush, I spent some time doing anatomy.  However, I realized I was spending way too much time on areas that were going to be covered by clothing anyway.  That made things simpler and eventually I split pieces up, created new clothing using Topogun as a base start, and also made a few props using Maya.


It still has a way to go, but it is getting there.  I think it will be easier to do some of the detail work once she is posed.  In the end, she is supposed to resemble this:


Close, but no stogies yet!

4/16/12

Cinema 4D: MoGraph and Bullet Dynamics

This past week has been my spring break, which really hasn't meant much, except that I got to take one day off and play.  In the mean time, however, I also picked up a copy of Cinema 4D R13 Studio while I could get it at an academic discount.  I have always been a fan of Cinema 4D, even though it isn't used heavily within the United States for animation.

I had a previous version of C4D on my computer, but not with all the bells and whistles attached to it.  This new version adds a lot of features that bring it up to speed with a lot of other comparable 3D packages.  One of the coolest features that is is mainly used for is called MoGraph.  It allows for some pretty interesting motion graphics to be created just by using expressions and simulations.  For example,  the following video called "No Keyframes" was created using MoGraph without any keyframe animation, just scripts:


One of the powerful things about MoGraph is its ability to clone a single object multiple times in whatever shape you want.  I decided to give MoGraph and the dynamics engine a test last night just for fun.  I took a simple cube and cloned it using MoGraph to a 20 x 20 x 80 matrix of cubes.  All in all, that turned out to be 32,000 cubes!  It was more than my computer could display at once if I rotated the camera, so I had to be careful on how I did things.  I ran the dynamics simulation of a heavy metal ball hitting the tower of cubes to see what would happen, making sure to save the cache.  It took a good half hour per element to run the simulation, which isn't bad considering that you have to simulate the paths, rotation, and velocity of  32,002 individual objects.  The cache wound up increasing the file size to almost 3GB, which tells you how much data is involved with something like this.  I rendered it out and added motion blur and the depth of field in After Effects:


All in all, it turned out okay, especially for a test.  There are guys in the industry that do this all day long with fluids, smoke, and other things.  I can't wait to get into some other cool features of MoGraph and learn it.  Cinema 4D, although it isn't the main staple of the animation industry in the United States, still has some fun potential.  In closing, take a look at this little short called "Hooked", made completely in Cinema 4D:


4/3/12

Thesis Project: Presentation Still Renderings

The end approacheth...

After a marathon week of doing texturing and rendering non-stop, I finally finished (almost) all the still renderings for my written thesis presentation.  Here are some of the renderings from previous semesters:


In the rendered views of the exterior of the Kobol that I had before, the camera angle was above the midline of the ship, which was making it look small.  I got a suggestion from my instructor to keep the camera angle close to the ground and it would look closer to how someone would normally view it if they were standing next to it.


I added some glow and lens flares to the renderings to help them feel a bit more surreal.  I know that the spaceship design isn't contemporary, but it's what I've been going with.


I spent most of my time this past week doing the final texturing of the interior of the Kobol.  One of the main changes to previous iterations is the addition of an architectural element above the angel statue in the main waiting area.  As I kept looking at, it just didn't look complete.  So I took a rendering and began to sketch over top of it and finally came to an iteration that I thought worked.


Each one of the final rendering frames for the interior took between one and a half to five hours to finish rendering.  With the amount of raytracing going on in the scene, it was no wonder.  I used mainly Mental Ray architectural materials for the shaders, which rely heavily on reflected light/color within your scene.  They do a really good job at creating metals and polished surfaces, which is what comprises most of the interior of the ship.


The plants were what was a main cause of grief in terms of rendering times and memory requirements.  I used a bunch of plants from the XFrog libraries, all of which are pretty high resolution.  In addition, the textures that the leaves have on them also use an alpha channel to get the transparency.  The way that Mental Ray handles raytracing through the alpha channels is apparently very time consuming.  Thus the hike in render time.


I also had to deal with some problems where some of the plants weren't rendering at all when I went to batch render.  I have been referencing the plants in so that I woudn't have to deal with the huge file size associated with just importing the files in.  In addition, I have been instancing some of the plants rather than just copying them.  That allows for a "copy" of the geometry to be made, but the data that created basically links back to the original geometry and just saves transformation, rotation, and scale data.  I did some investigation and discovered that the plants I had imported that were grouped weren't being recognized as true instances when render time came around, so I cringed and just duplicated the plants. My file size increased about 130MB, which is a lot for a 3D file, but it is still manageable by Maya.


I also spent some time working with the procedural texture generation program Genetica Studio.  It allows you to mix a bunch of procedural texture nodes to create a high-resolution, seamless texture.  I used it for most of the marble and stone textures as a base and then added some more photographic texture on top of the images I created.


I also created a depth pass for each of the scenes I rendered out.  This allows me to do a quick depth of field blur to the scene anywhere I want to rather than relying on Maya to generate one that I have no control over in post.


Overall, I am satisfied with the results.  It definitely adds a different flair to the model, but the marathon texturing session isn't one I ever want to repeat... like that ever happens in the industry!


Now that I have most of my stills done, I have been printing my final written thesis book.  It is taking a while, but it has allowed me to work on other items as I go along.  I still have some animated footage to work out, but for the most part, I think I am on my way to the end.