 In order to add more depth and realism to a texture, there are two particular attributes that must be added to a texture: Bump map and specularity.
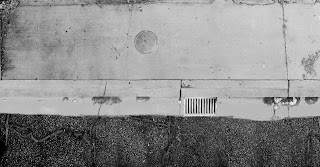
Bump mapping was developed as a way to simulate tiny changes in 3D geometry without having to actually model in those details. 3D programs use a grayscale image as data to tell exactly how to display these little details. In a bump map, 50% grey represents no change in surface texture. 100% white represents the most extreme extrusion of the surface while 100% black represents the most extreme indentation of the surface. On top of that, you can control the overall 'depth' of the bump map, although this can start to look really fake if you get it too deep. Here is the example of the bump map for the sidewalk part of the image:
Specularity is essentially a way of cheating the reflection of light on an object. All surfaces are reflective to some degree, but trying to simulate reflections in any 3D program is time-consuming. Instead, the program essentially lets you determine how sharp a highlight across a surface will be. For example, a really glossy surface would have a really sharp highlight, while a very rough surface would have the highlight spread far across it. In addition, you can control through your texture where parts will have a specular value and where they won't reflect any specular light at all. For example, in the following specular map for the sidewalk, you can see the areas that are white will show up with a highlight when the light strikes it at the right angle while those areas that are black won't show any specular light at all:
 The specular map for the wall. Notice that some elements are included here that aren't included in the bump map, namely the grime and graffiti.
I believe that this is it for this assignment. It was fun to go out and create textures, but I am ready to move on to something else. Stay tuned!


No comments:
Post a Comment