
It's the most wonderful time of the year... well, for the most part... unless you are rushed to make a gingerbread house. If you think my pumpkins are crazy, just you keep reading.
People keep asking my mother and I how we do our gingerbread houses, so I decided to document our process as best as I could and post it here in all of it's glory. Some people may say that we are giving away our secrets, but I figure if you are brave enough (or crazy enough, most likely) to give them a try, then you can have some fun at it... or incredible amounts of frustration.
(Blogger's note: I may be editing this with corrections made by the technical director of the project, i.e. my mom.)
First of all, it starts with an idea. I like to sketch up a few ideas, drawing from different architectural styles. We've done all sorts of different styles before from gothic cathedral (complete with flying buttresses), to southwestern adobe architecture, to simple bungalows. I always have to keep in mind that for the most part, you are limited to flat planes for your construction:

 The first thing I always do is to lay out the floor plan of the gingerbread house. Remember, the pieces you make have to be able to fit on a pan in your oven, so it can't be too big unless you want to create your own pan out of sheet metal. Also, creating the floor plan also gives you an idea of how big your base will be. We do a few crazy things with our designs and have used cardboard bases, styrofoam bases, and plywood bases. I think we like the plywood the best because it stays sturdy and you can mount hardware and lights to it.
 The next step is to create all of the patterns for your pieces. I use the professional illustration software Adobe Illustrator to do my patterns because I can just line them up with each other and the floor plans to create exact measurements. Also, if your pieces are too big to print out on a single piece of paper, you can divide them up and tape them together later. I also like to do mine digitally because I can always print off more if I need them.
IMPORTANT NOTE: When designing your pieces, keep in mind that they will be around 1/4 inch thick or more when finally baked. It is the worst thing in the world to put your roof on only to find out that it is a half inch too short.
Next, you need some gingerbread. My mom and I have found a recipe that we tend to like the best out of the ones we have tried. To give you an idea, the gingerbread house we created this year was approximately one batch. We made two just in case we needed to make more pieces in case one broke, but usually one batch will do.
Gingerbread Dough Recipe:
- 6 Cups All purpose flour
- 1 3/4 cups sugar
- 2/3 cups shortening
- 1 tablespoon ground cinnamon
- 1 tablespoon ground ginger
- 2 teaspoons double-acting baking powder
- 1 1/4 teaspoons salt
- 1 teaspoon baking soda
- 1 teaspoon vanilla extract
- 1 eight-ounce container of sour cream
- 2 eggs
- Parchment paper
To prepare dough: Into a large bowl, measure 3 1/2 cups flour and remaining ingredients. With mixer at low speed, beat until well mixed, constantly scraping bowl with rubber spatula. With hand, knead in remaining 2 1/2 cups flour to make a soft dough. Wrap dough in plastic bag and refrigerate 2 hours or until dough is not sticky and is of easy kneading consistency.
Next, after your patterns are created, it is time to roll them out. We typically roll the dough out onto parchment paper first, that way we can easily transfer them to the cookie sheet that they will be baked in.
 Before you put the patterns on, spray them with a cooking spray to prevent them from sticking to the dough when you need to pull them off:
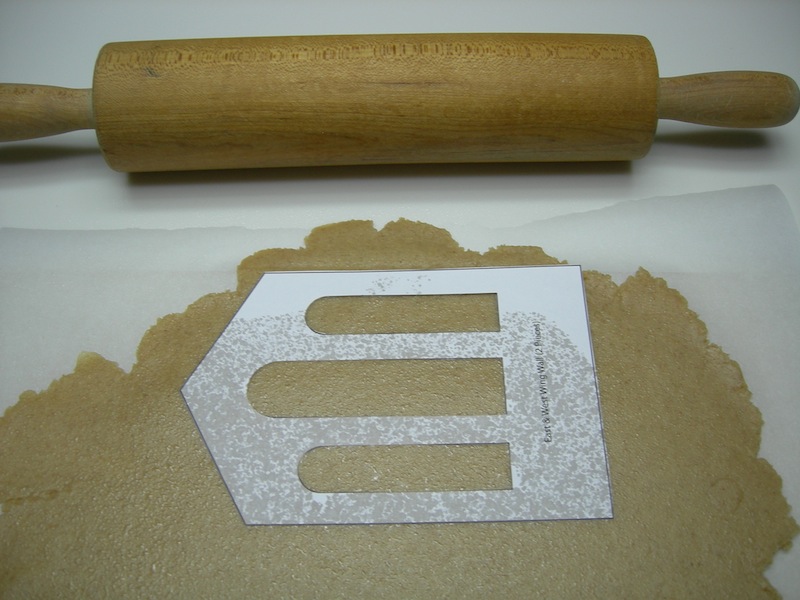

 You can then place them in the pan to bake at 350° until the pieces are golden brown and are very firm when lightly touched with your finger. Remove them from the oven and place the cookie sheet on a wire rack to cool for 5 minutes. Carefully remove the parchment paper with the baked pieces from the cookie sheet and place on the wire rack to cool completely. You will want to use new parchment paper if you are going to make hard candy windows for your gingerbread house. It is at this time when you can use a small serrated knife to trim off any pieces that may have made your gingerbread crooked.
 Next, we always create hard candy windows for our gingerbread houses because we place a light inside them and like for it to shine out. The light adds nice ambiance and also the smells of all the ingredients is great when the house warms up. We use a typical hard candy recipe that you would use for lollipops, just with a few things omitted. You can either do it on the stove or in the microwave:
Microwave Hard Candy:
- 1 Cup granulated Sugar
- 1/2 Cup light corn syrup
Thoroughly mix sugar and light corn syrup in a 4-cup microwave glass container. Cover with plastic wrap. Microwave on HIGH for 3 minutes and 15 seconds. Remove from microwave. Peel back plastic wrap, taking care to avoid the hot steam. Stir and then cover with a NEW sheet of plastic wrap. Microwave on high for 3 minutes and 15 seconds. Remove from microwave. After boiling subsides, feel free to stir in coloring if desired. (The natural color is a light yellow, so keep that in mind when mixing colors. We once tried to create a blue color, but wound up only creating green.) Carefully spoon into window areas and wait to harden. If you are using parchment paper, the hard candy shouldn't stick to it.
I believe this recipe can also be done on the stove, but requires the use of a candy thermometer. Heat ingredients to the 'hard crack' stage and spoon in.
 After you have created your windows, one trick we have found is that it is easier to decorate them when they are laying flat, rather than standing up. This is a great time to do so without tearing your hair out later. Now it is time to create the icing.
A WORD ON ICING: Royal icing isn't like your typical cake frosting. When it hardens, it is close to the consistency of concrete and very sugary. It also requires using raw egg whites, so I don't recommend eating it because it can sit out for quite a while some times. The last thing you want is a case of salmonella ruining your holiday cheer.
Royal Icing:
(Makes 2 cups. You will probably have to make several batches)
- 3 egg whites (We typically get the health food all egg whites in a carton or even powdered egg whites)
- 1/2 teaspoon cream of tartar
- 1 sixteen-ounce box confectioner's powdered sugar
In a large bowl combine all ingredients. Beat 7 minutes with an electric mixer until smooth and thick. A good test is when a knife blade drawn through the icing leaves a clean cut. Store in a tightly sealed container if you are not using it right away. You can also cover the top of the mixing bowl with a wet paper towel to keep it from drying out:

It also helps at this point to have a good set of frosting bags and tips. I think we are using a set of tips that is older than I am, so they are a good investment if you like doing confectionary decorating.

 You can also mix in food coloring with the icing to create different colors. We have typically mixed in green for doing trees and bushes. We have also found that small waffle cones work great as pine trees and marshmallows work great for short shrubs:
 A WORD ON DECORATIONS: Let your imagination run wild. Typically, we try to get stuff from the bulk section of the grocery store. It's fun to walk through and imagine the things there are something else and see what you can come up with. We found a small can of these holiday cookie decorations and they worked great:
Once you have your windows decorated and dried, you are ready to put up your walls. This usually turns into a three man job, so make sure you have someone to help out: two people hold while one works the frosting. You should only have to hold the walls for a few minutes because the frosting dries out fairly quickly depending on your climate (In Utah it dries quickly, but more humid places, it can take a while unless you add more powdered sugar to dry it out.) Yes, we even put some trees up inside next to the windows so you could see them from outside.
 You may find yourself accidentally cracking a piece. If that happens, don't worry too much because you can 'glue' it back together with frosting. I have this crazy personal rule that all construction materials have to be edible. It makes it more of a challenge. You may choose to deviate from that a bit, but remember, that Elmer's Glue is non-toxic and therefore probably edible...
 Also, you may find that some of your pieces don't fit in their crevices and need to be trimmed. If this is the case, you can delicately use a knife with a small serrated edge to do your trimming. Just be careful because your gingerbread can crumble fairly easily.
After you feel confident that your walls are sturdy enough, feel free to put up the roof:
 I like to let it sit for a bit to dry at this point, but you can still keep working from here. At this point there is no real prescribed order, but we typically work on the house, then the surrounding yard.
You can use different materials on the roof, but one of our favorites to use is Big Red gum. It gives the house a great fragrance as you walk by it and it also has great color. (Some other ideas include Smarties or Spree for terra-cotta tile or Frosted Mini-Wheats for a thatched-roof look.) You can do whatever pattern you like. This year, we went for a terra-cotta tile look, but you can also do a staggered asphalt shingle look using gum as well. Just to give you an idea, the roof on this house took approximately 73 pieces (cut into thirds) to cover it.
 Another trick we learned it how to use gumdrops for your own creations. I typically use them for wreaths and ribbons. You can microwave them for about ten seconds to make them warm, then roll them out flat over some spread granulated sugar. Then you can cut them out to whatever shape you so desire:
 From there, let your imagination soar. We did a lot of decorating from this point and finished the house for the most part:
 Creating icicles in probably something you can do before working on the yard, although you could also save it for the end. This can also be a two-man job: one person works the frosting and the other cuts it off at the right length. We have found the best cut-off tool to be a simple toothpick, but with a bit of a trick. Between icicles, stick the toothpick in your mouth and slather it with saliva. It sounds gross, but it makes the end of the icicles not stick to your toothpick. After three or four in a row fall down, you'll see what I mean:
Every year we try and do something innovative that we haven't tried before. This year it had to do with the yard. Before we have either tried painting or using flock to cover the base to make it look like snow, but it either dries and shows the texture of the plywood or cracks and falls off. This year we decided to frost the entire base. We wound up also sprinkling decorative granulated sugar on top of the frosting, which creating the glistening effect of new-fallen snow:

Well, after many man-hours, we finally completed it:


5 comments:
Amazing again! It was fun to read how you did it all. I had no idea it took seventy-three pieces of gum for the roof! And the waffle cone is a neat trick. Where did you use the gumdrops though? Was a green one the wreath? I REALLY like this style. It looks so Christmas-y and the snow is AWESOME!
Johnny said:
That's incredible! Way better than mine last year haha.
Holidays are always more fun with Brad around!
As stated by others:
INCREDIBLE!
love and miss you,
A
That is awesome! I love those little waffle pretzels. You put them to good use.
Post a Comment