1/30/12

Thesis Project: Kobol Polygonal Modeling

This week I did more detail work on the Kobol model.  The semester starts up for me today, so I've got a lot to get going.  I'm also on the job hunt, so we'll see how that all goes.


There are a number of things, now that I've translated this into 3D, that don't fully work with the design.  I will be doing a bit more sketching to get some ideas of how the mechanics work and how to better terminate the design of the engine exhaust ports.


1/24/12

ZBrush 4R2b: Lazy Day Sculpt

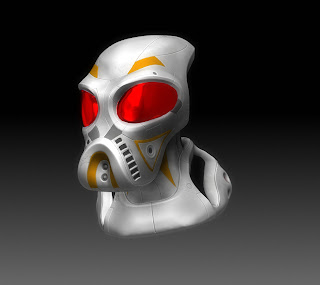
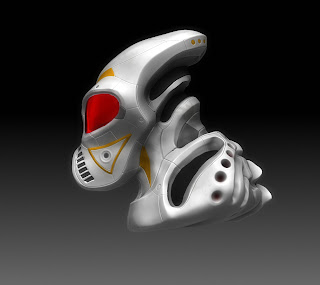
Every once in a while I run into a creative slump while working on a project.  I hit that the other day and decided I needed to do something to reinvigorate my creative juices.  This morning I got an email telling me that I could update my version of ZBrush to the latest: R2b (don't ask me about the naming conventions...).  I decided that would be a great chance to pull out ZBrush for a quick sculpt using the new hard surface brushes that I have been wanting to try out.  So, using Dynamesh, grouping polyloops, Polypaint, and the like, I decided to do another alien bust.


I guess it's sort of an alien environmental suit thingy.  Maybe I'll do a time lapse of an alien that would wear this thing.

Thesis Project: Kobol Modeling Progress

This week I spent some time doing some touch up work with the top surfaces.  Thankfully, I was able to remember a few of the tips and tricks that I have picked up during my personal study of Maya and did some massaging to the polygons.  I used the original NURBS surface to snap the polygon points to so no matter where I moved them, they always stayed on the surface.  That helped to maintain surface continuity and allowed me to help blend things out.


Matching up the top to the bottom has been a pain, though.  I got all the way through with it only to discover that the bottom had one more row of edges than the top.  I have a few things I can try, but we'll see how well they work.


1/12/12

Thesis Project: Kobol – Modeling Beginnings

 Now that the holiday break is over, I am back to working on my thesis project.  The next piece is actually something I have been looking forward to working on for quite some time.  The Kobol is an interesting ship, because it's sort of an intergalactic popemobile.  Think if a televangelist had a spaceship in a retro-science fiction future and you've got this thing.


Because it's such a fluid shape, I thought of many ways to try and do the actual modeling for it.  I wound up going with NURBS to start off with, although I can think of other ways to satisfy the design.  We'll see if this approach works.  I started off with a few NURBS curves to define the base shape of the hull.


Although I tried this approach, the surface wasn't tangent at the XY plane, so having symmetry would be difficult.  I had to try a few other things, but eventually wound up with something worthwhile.


After finding a viable mesh, I started cutting out certain parts and tried to get the topology even across all the surfaces.


One thing I use to always get caught up in when working with NURBS is that I always tried to have the surfaces be completely perfect in tangency to each other.  However, once you convert to polygons, usually all the work you've gone through tends to be lost in the conversion.  The main thing I needed to focus on, really, was the topology and getting it to flow evenly across all of the surfaces.


Once I did that, I converted the surfaces over to polygons and began adding edge loops to harden up the corners of the angel emblem on the hull.


It's not a bad start, but I might have a bit more work to do if I find out that the other half doesn't work in symmetry.  That might merit starting over again, which isn't desired, but might be necessary.

A Super ZBrush Sculpt

This blog is getting a bit dusty, so I feel compelled to post something.  While I had a bit of a break, I decided to take on a short project in ZBrush just to get used to the workflow between it, Topogun and Maya.  I wanted to see if I could create a super hero human figure faster using that workflow than the traditional one.


To start off with, I created the basics of a human form using ZSpheres.  These little do-hickeys are used for lots of things, including being able to generate meshes from scratch in a short amount of time.  Once I got the spheres in relatively the correct place and size, I used the Adaptive Mesh command to basically create a skin over all of the ZSpheres and create a base mesh.


Starting off with this base mesh, I could then subdivide the model a number of times to get a high resolution mesh and be able to sculpt all of the fine details of the muscles.  One of the things that came in handy with this was the Dynamesh feature of ZBrush.  Essentially, it is a voxel sculpting feature that allows you to re-mesh your model and avoid distortion from stretched polygon edges.


Mind you, this was just in a matter of a few hours I was able to get to this point.  If I was just creating a digital sculpture, I could probably leave it at this level and call it good.  However, one of the things about creating from scratch in ZBrush is that you don't get good topology on your model.  Dynamesh, especially, is a culprit in this because it needs to use triangles to to do the voxel operations (at least that's what I can surmise from my experience with it).  Therefore, once I got it to this point, I could take it into Topogun and retopologize the base mesh.


In Topogun, I imported the high-resolution mesh and began to draw out the correct basic topology of the base mesh.  I would start off simple in patches, then add edge loops where they were needed on the patches to then line things up.  That whole process took about half a day, although I can see some things that need to be better the next time I go forward with something like this.


Once I reimported the base mesh into ZBrush, it adjusted the subdivided geometry accordingly and after a few cleanups, I was able to have a mesh with all the correct topology lines.


I was then able to redefine a few important anatomical features and wound up with a final sculpt, ready to be used to pose or extract clothes from.  It was a good exercise, and in total took only about three days versus a week doing it the old fashioned way.  If I was a good experience and I can see a lot of potential for character creation from it.


The anatomical proportions need more attention in this, but since it's an exercise, I am not too worried.  I'd increase the volume of the legs and maybe the hips.  Overall, though, not a bad start.